Tripods, like so many things in the camera department world, are significantly more complicated than they seem. The best tripod and head configuration depend entirely on what your camera configuration is, as well as what you intend to do with it. So, if you ever find yourself mystified by the plethora of camera support options – or you didn’t know you had a plethora – read on.
First, let’s get this basic truth out of the way: while they perform a similar function, tripods meant for stills differ greatly from tripods meant for film and video. Many photo tripods will pan and tilt, but most lack the fluidity and payload support necessary for motion picture work. They are just not designed to capture smooth movements, support 70-pound camera builds, or be swapped from tripod to dolly to jib to slider – because they don’t need to be.
Tripod Head Mounting Options
Speaking of mounting a tripod head on all sorts of things, let’s start from the ground up and talk about the different mounting bases available to us. Although most of the time, people tend to think about “a tripod” as one singular piece of equipment, it makes more sense to consider the head and the legs as separate devices, because the head will not always stay on the legs. Because of this, it’s essential to consider the base you’ll be using.
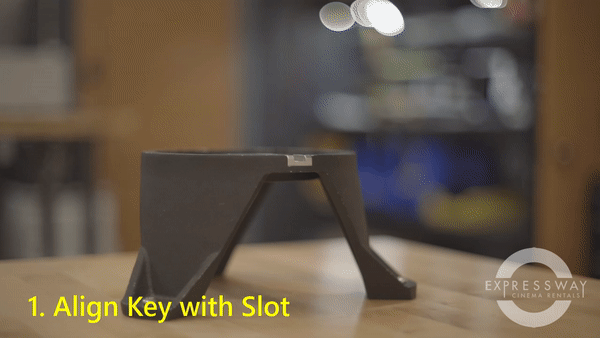
The Mitchell Base is a flat platform with a hole in the center for a tie-down, and a “key” slot that prevents the head from rotating in relation to the base. For many professional applications, Mitchell is the standard. It is the sturdiest option, as well as the lowest profile and most easily adaptable. Most professional dollies, jibs, sliders, et cetera are Mitchell mount for these reasons. The downside is that it is more difficult to level than other options. If you are using a Mitchell head, you should make sure your package has standard legs, baby (shorter) legs, at least one ground spreader, a Hi-Hat, and a Low-Hat. Outside of specialty applications, this should cover you for most standard shooting situations.
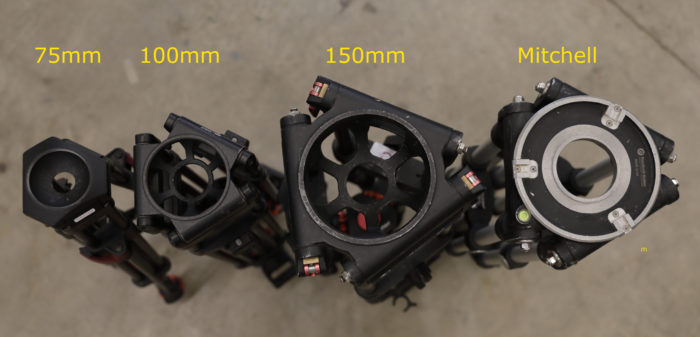
If speed and flexibility in leveling is a higher priority than sturdiness, bowl mount is a good option. With a bowl mount head, the only thing necessary for leveling is to loosen the tie-down, rotate it around in the bowl to the desired point, and tighten the tiedown again. The downside with this option is that if the tie-down isn’t tight enough, or the payload is too high for the head, it can slip in the bowl. There are 3 common sizes of bowl mount: 150mm, 100mm, and 75mm. This distance refers to the diameter of the top of the bowl. The rule of thumb (kind of obviously) is the heavier the camera, the larger the bowl you should choose.
If you are using a bowl mount head, it’s a good idea to make sure you have a hi-hat and an adapter from your head’s ball diameter to Mitchell. This covers you for most camera movement situations like Dolly, Jib, Slider, et cetera.
Another option for very small camera builds is the flat base mount. This is a flat base (duh) with a male thread on the mounting point side and a female thread on the tripod head side. This option is not seen on higher-end professional sets very often, but can provide fluid pans and tilts on a budget.
No matter what tripod head you are using, communicate with the DP as well as the grip department to ensure compatibility for anything the camera will be mounted to.
Fluid Heads
The most common type of tripod you’ll see on most jobs will be of the fluid head variety. This means that the motion mechanisms in the head are dampened by a grease-like fluid that provides a (usually adjustable) level of resistance for smooth panning and tilting. Fluid heads come in all shapes and sizes for different applications, but the main utility they share is smooth panning and tilting.
The gold standard for fluid heads on a professional job with a large camera is the O’Connor 2575. You will see this thing everywhere, so it will be the focus of this article. It has been around for decades and probably won’t go out of style any time soon. This head is available in Mitchell and 150mm bowl, although Mitchell is significantly more prevalent. The same goes for its smaller fluid head sibling, the 2560. Rumor has it the numbers represent the weights at which each head is ideally balanced (i.e.2575 = 25 to 75 pounds, 2560 = 25 to 60 pounds, 1030 = 10 to 30 pounds, et cetera). This may or may not be true, but it seems right.
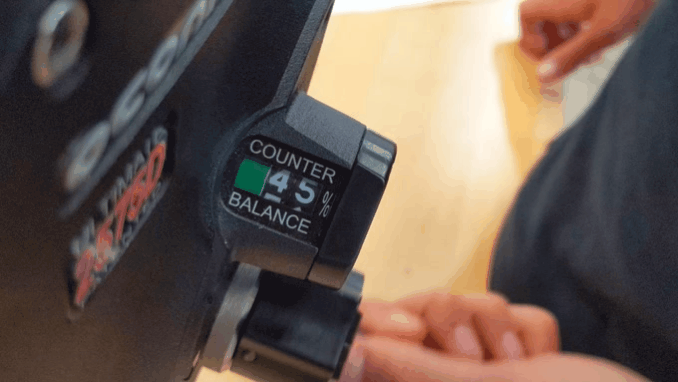
These heads are incredibly reliable, sturdy, and full of very useful features. You can adjust the drag of the pan and tilt axes with the “Pan Fluid” and “Tilt Fluid” knobs, “0” on the dial being the loosest movement and “9” being the stiffest and steady. Also, that counterbalance knob is important! It is adjustable from 0% to 99%, but it’s not safe to be all the way on either end of that scale.
Quick Step-by-Step Guide to Balancing a camera on an O’Connor 2575
- Ensure the head is level using the bubble
- Ensure all the camera accessories are attached
- Lock Tilt and Pan
- Mount camera securely by clicking into the Quick Release and locking
- Unlock Euro Plate with the Platform Release Lever and slide fore and aft to approximate a balanced
position, then lock the Euro Plate again - Adjust counterbalance to 50% and Tilt Fluid to 0
- With a hand securing the camera from falling, unlock the tilt
- Maintaining a grip on the camera, tilt slightly up and down to determine if the payload is front or back
heavy - Return the camera tilt position to level and lock the tilt axis again
- Seriously, keep your hand on the camera – and disengage the platform release lever to loosen the
grip on the Euro Plate - If the payload was front heavy, slide the Euro plate back. If it was back heavy, slide it forward
- Lock the platform release and test the balance. Repeat until a good balance is achieved
- If the head tends to fall in the direction of the tilt when tilting, unfold the counterbalance knob and
increase the counterbalance (try to stay in the green zone). If the head tends to spring back to level
when tilting, decrease the counterbalance - With all safeties locked, operate the head and ensure that it stays where you put it while tilting. Once
you are satisfied with its performance, you can finally let go of the camera
Another common fluid head, for lighter camera packages, is the Sachtler 18p, as well as its big brother, the 20p. These heads are 100mm ball and offer much of the functionality of the O’Connor heads in a much smaller and lighter package. On these heads, the drag of the tilt and pan is adjusted using rings instead of knobs, but it’s the same basic concept. Sachtler also makes 75mm bowl fluid heads such as the FSB-8 and DV-1 that operate in a familiar way for lightweight camera builds.
There are other quality fluid heads of all sizes and bases, but this is just a blog post, so I’m only mentioning the ones I usually come across.
Geared Heads
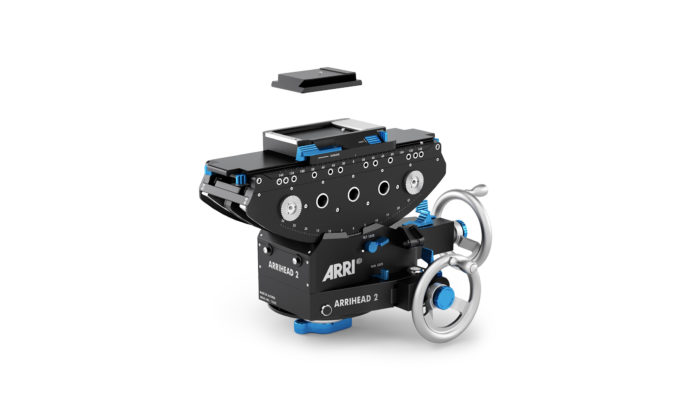
Before we get bonkers with an extra axis, the last remaining style of tilt and pan tripod head to know about is a geared head. Not to be confused with the dinky stills style of tripod head with the same name, a cinema geared head such as the industry-leading Arrihead, or others like Worrall and Mitchell, is quite large and meant for high payloads. On a geared head, the operator has precise control of pan and tilt via two weighted wheels (one for each axis). There are marks along these axes, allowing for more precision when it comes to very tight shots, or repeating a movement over and over. Another advantage is that the geared head is designed to tilt on the camera’s optical center (which I’ll illustrate expertly in the next section). Operating a geared head is not a skill that comes naturally to most, and takes a good amount of training and practice, but adds significant value to a camera operator’s skillset.
Specialty Heads
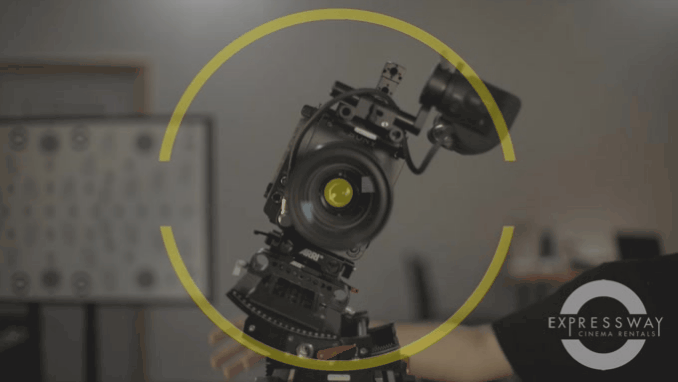
Sometimes a simple pan and tilt fluid head doesn’t do the trick and you need a head that is a little more specialized. One example of this is a “Nodal” head like Cartoni’s Lambda head. While still under the category of “fluid head” the Lambda head looks significantly different than most others you’ll see. This beast comes in a 2-axis (pan and tilt) model with an option to add a third (roll) axis. The benefits of using a head like this are that you can easily operate it underslung on a dolly with no obstruction for overhead shots, as well as being able to adjust the camera’s nodal tilt center, so that the camera tilts up and down from its optical center, as opposed tilting on an “arc” because, on a standard fluid head, the axis is the center of the tilt. Here’s a helpful GIF of the Lambda head tilting with the axis lined up on the camera’s optical center:
And here’s tilting on a standard fluid head – notice the arc of the tilt in relation to the tilt axis:
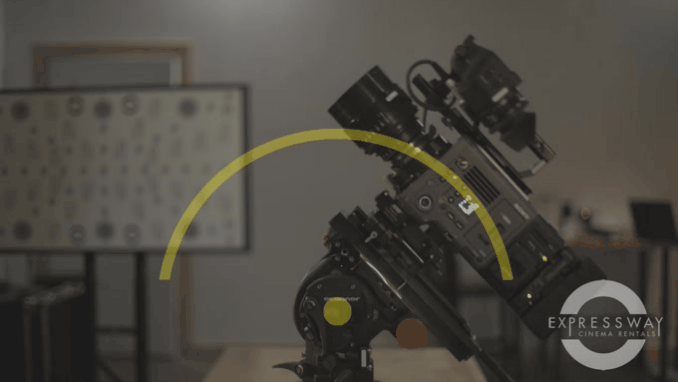
Of course, it’s hard to say that one of these is objectively “better” than the other. Different jobs require different tools. However, it’s important to be aware of the differences to make the right choice.
Lambda heads are quite big and heavy, so they are definitely not all-purpose, but the creative and technical flexibility you get is worth the extra bulk. Basically, you can do super cool 360-degree rolls and tasteful dutch angles with ease – if the third axis module is installed.
Another useful add-on is a 3rd axis device like the Tango Swing head or Cartoni Dutch head. Both of these devices attach to a standard fluid head and enable the operator to perform a roll move during a take, as well as quickly leveling a shot without having to go through expanding and collapsing tripod legs. The Tango is the real star here because similar to how the Lambda allows for tilting on the camera’s nodal center, it allows the roll axis nodal center to line up with the camera’s optical center. Basically, this means the center of your frame will remain the center of your frame, even if you are rolled 45 degrees off center.
A typical dutch head sort of arcs the camera to either side, changing the center of the frame as the “dutch” angle becomes more extreme. Both have their applications, but the Tango is probably the greater engineering achievement.
Believe it or not, I could go on and on about camera support options because there is a lot more information out there, but this covers the basics of tripods used in cinema production, so at least when you hear the word “Tango” during prep, you won’t show up to work with a rose in your mouth.