Menace arms are an amazing piece of grip equipment that can take your shot to the next level by allowing the light to land somewhere that might not have been possible with a regular stand. Often they are used to arm out a backlight or get a light out in a position that keeps the stand out of frame. However, they can also create a hazard on set if they aren’t built and used safely. As with any piece of specialized equipment, you or the production you are working for should be carrying liability insurance, and if you don’t feel that you are equipped to safely operate it, it is always best to hire a professional. This is intended as a guide for aspiring G&E folk and should be followed up with a hands-on lesson from a professional mentor.
PARTS NEEDED:
(1) Combo Stand w/ Lollipop or Mombo Combo Stand (wheels are a plus)
(1) Menace Arm Hardware Kit (3 Pieces)
(1) 1.25” Schedule 40 Steel or Aluminum Pipe of Selected Length (generally no longer than 12’)
(2) 14’ or Longer Ratchet Straps
(1) Safety Chain
(6) 20lb Sand Bags or Similar
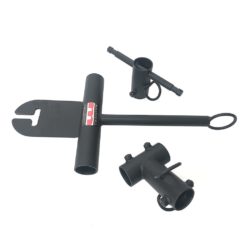
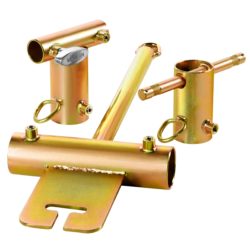
1. Assemble the Menace Arm off-set somewhere with room to work. Slide the pipe through the center bracket of the menace arm hardware. You want to position this with about 70% of the pipe sticking in front of the post, and 30% behind the post. If you send too much of the pipe to the front, the triangulation created by the post will not offset the weight in a safe and effective way.
2. Install the front pin/receiver and the rear hardware with the rings for the ratchet straps facing the same direction as the support post.
3. Thread the ratchet from the fixture end of the pipe, through the support post, and hook it onto the rear ring of the menace arm hardware.
4. Crank the ratchet tight until it creates just a slight upward bend in the pipe. Clean up the ratchet strap slack.
Once you have completed these steps, the Menace Arm is now prepped and ready to be brought onto set.

5. Carefully bring the menace arm onto set where the other grips should already have the stand placed and sandbags standing by, as well as the electrics with a ladder, power, and the lighting fixture.
6. Place the ear portion of the support post in the grip head of the stand. Make sure the knuckle is righty-tighty and that one stand leg is pointed in the direction of the weight. Hook the long end of your other ratchet onto the rear hooks, and leave it loose hanging down. We will be fastening this to the stand in a few more steps.
7. Hold the weight while the light is mounted on the pin-end and safety-chained. Once the light is mounted leave that person to support the weight (and climb the ladder if needed) while you go and raise the stand to the desired height. Remember to consider the length of the menace arm and the weight on the end when thinking about how high you should safely raise the stand.
8. Once the stand height is set, with the other technician still holding the weight, take your hanging ratchet strap and hook it into the bottom of the stand post. Slowly begin tensioning the ratchet strap and watch as the weight from the end of the boom is centered back over the stand. Once the boom is perpendicular to the stand riser, give the strap one or two more cranks.
9. Before releasing the technician holding the light, be sure to bag the stand thoroughly and safely.
10. Before walking away, be sure that all cable is managed safely and neatly along the boom with enough slack at the head to allow the electricians to pan or tilt the light as needed to focus it.
Breaking Down The Arm
1. Have a technician climb the ladder and support the weight on the fixture end.
2. Break the ratchet strap that is connected to the stand. At this point, most of the weight of the light will transfer to the person at the fixture end.
3. Stick down the stand while the technician supports the weight of the fixture.
4. Remove the fixture.
5. Remove the Menace Arm from the stand and take off of set carefully.
6. Break down the Menace Arm at staging or out of the way and return the parts to the truck.
Written By: John Baumgartner – General Manager
In three words: Kind, Caring, Balding. With a vast knowledge of camera and lighting gear, John will help see your project through from start to finish. When not knee deep in poorly coiled stingers, John enjoys exploring Philadelphia’s extensive restaurant scene and day sailing on his glorious 13′ yacht.