The most common type of L&D we see in the camera department is damage to optical components. Lens elements and filters are sensitive and prone to scratches, even in the hands of the most careful technician. We inspect our lenses very carefully before and after each rental, noting any existing scratches or digs, as well as mechanical and cosmetic inspections to ensure we are giving you an item in its best possible condition, and also avoiding any confusion if an item comes back damaged.
Sometimes even a small scratch can render an optical component un-rentable. Having high standards allows us to confidently send out our optics knowing they are ready for any and all situations – including shooting at T/16 with a light source pointed right down the barrel of the lens. In scenarios like this, your sensor will see any imperfections you thought you’d never catch – especially if these imperfections are on the rear element. So, you can understand why we are perhaps a little particular when it comes to maintaining optical integrity.

The leading causes of damage are improper storage (tossing a lens or filter in a backpack, or leaving it un-capped/uncased on the top deck of the camera cart or in a run bag), and even more frequently, improper cleaning. It may sound obvious, you should only clean optics when they need to be cleaned. Every time you touch the glass with anything at all, you do risk damaging it, so having discretion about when it needs cleaning does a lot to mitigate damage.
You will hear many opinions of best practices for keeping glass in good condition. Some will say breathing on the lens and cleaning it with a clean t-shirt is all you need (please don’t do this – breath contains bacteria and acid, both of which are really bad for lens coatings). Others carry around their trusty microfiber cloth that has been used thousands of times and probably has lots of (nearly invisible) abrasive little flecks of debris. The following is a slightly more particular method that we have found to be safe and thorough.
Basic steps to safely clean a lens element:
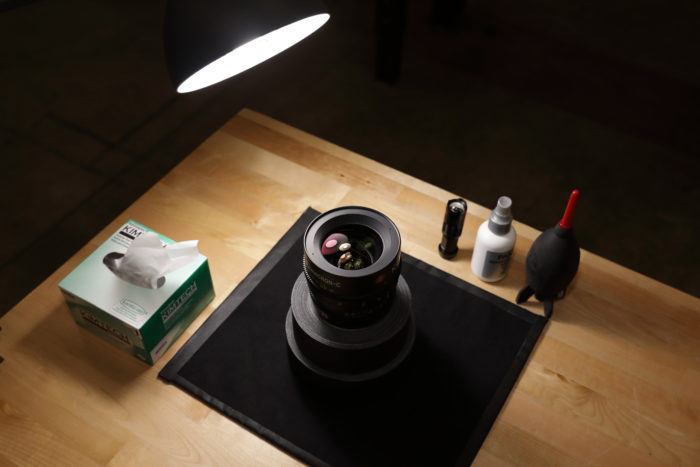
- Set up a clean work area, ideally with a soft overhead light that’s not excessively bright (900 lumens/40w bulb) and a soft, non-slip surface (I use a mat with duvetyne on the top and rubber on the bottom. Something to hold the lens upright really helps as well. Depending on the lens, two rolls of gaff tape makes a sturdy enough working base.
- Have the following tools and materials handy: a rocket air blower, a flashlight, low-lint lens tissue that comes from a closed container (we like Kimtech wipes), and an alcohol-based lens cleaning fluid (Pancro works well).
- Start by blowing away as much dust or debris as possible with air. Try to blow the air in such a way that it doesn’t push dust into the lens. Any debris left on the surface of the lens when a tissue is applied is a potential abrasive and can lead to scratches.
- Examine the surface of the glass by moving the lens around at different angles to catch any smudges or other dirt, to know what you are up against. Shine a flashlight through the rear element toward the front (being careful not to hit the rear element with the flashlight) to illuminate things you may not have caught with the overhead light.
- For a large element, cleanly fold a lens wipe into fours in such a way that makes it easy to hold onto. If you are cleaning a smaller element, fold a wipe in half, put your index finger into the fold, and wrap the remainder around your finger to form a point.
- Before touching a wipe to any glass surface, ALWAYS spray a small amount of cleaning fluid onto the wipe, never onto the lens itself. A common mistake is using too much cleaning fluid, which will leave behind a residue.
- Wipe very gently, starting in the center of the element and slowly spiraling outward. The most likely place for grit and debris to settle is on the edges, so if you were to start on the outside you seriously risk dragging that debris back onto the lens and scratching.
- At the end/outside of the spiral, lift up the wipe in a swift, “scooping” motion, to remove any particles that hitched a ride onto your wipe.
- The wipe you just used is now DEAD TO YOU. Throw it right in the trash. Unfortunately for trees, you should never, ever use the same wipe twice. The logic is sound – you just used it to remove things from the surface of the lens, why would you want to put them back on?
- Repeat this process until the lens is clean, using the blower in between rounds of cleaning to ensure any loosened debris is blown away.
On Set Care
The same cleaning process applies to filters, more or less with some slightly different precautions. The most common damage to a filter is a long scratch directly down the middle. This is caused by sliding the tray into the mattebox stage in such a way that it scrapes against the tray in front of or behind it. This is a remarkably easy mistake to make, as you only need to slide it in at a very slight angle to make contact with the next tray. Take extra care when inserting or removing filters. Also, if you are in a dusty or sandy location, turn filter pouches upside down and use a blower or canned air to blow any debris out before putting the filter back in.
When it comes to handling filters, one safe way to hand off a filter and put it into a mattebox is as follows. We’ll call the person bringing the filter the 2nd AC and the person receiving the filter the 1st AC (even though it may differ from job to job):
- The 2nd AC pushes up the filter from the bottom of the pouch and grabs it by the sides
- They then carry it with their palm facing up until they meet the 1st AC camera-side.
- The 1st AC holds the filter tray in one hand, and their other hand palm up, at which point the person retrieving the filter places it into their open hand. The 1st AC then verbally confirms they have it. Keeping a palm under it and verbally communicating the hand-off mitigates the chance of damage..
- Once the 1st AC has the filter in their hand, they hold the tray out palm up and gently slide one side into the bottom of the tray and rest it on the release. Then they simply pull the release and the filter will fall right into place.
- To put the tray in the mattebox, they slide the tray into the open stage of the mattebox with one hand and tighten the lock, all the while keeping their other hand under the mattebox to catch it if it were to fall through.
Similarly, here’s a safe way to hand off a lens:
- The 2nd AC retrieves the lens from the case, leaving the caps behind (no reason to juggle)
- Holding the lens with both hands, they bring it to the 1st AC standing at the camera with the previous lens in hand
- The 1st AC places the old lens into the 2nd AC’s hand, front element down.
- When the 2nd AC feels confident about their possession of the lens, they verbally confirm (“Got it” or “Mine” usually does the trick). This is the 1st AC’s cue that it’s safe to release the lens.
- Once the 1st AC’s hands are free, the 2nd AC places the new lens into the 1st AC’s open hand, once again – front element down, and doesn’t let go until the 1st AC verbally confirms.
These techniques are what works best for a lot of people, but if any part of this feels clumsy or awkward, work out your own way. It’s better to be unconventional and comfortable than to drop a lens because you were strictly adhering to a series of instructions. The most important thing is that you communicate your preferred method with whoever else is involved in the handoff. Seriously, eye contact, verbal confirmation, and focus go a long way.
The moral of the story is as important as it is obvious – be careful whenever handling optics. Always consider how whatever you are doing could result in damage to the glass, and just do the opposite of that. That mindset coupled with the best practices and rules of thumb highlighted in this post should keep the L&D gremlins out of your life!